How to Use a Glass L Clamp for Perfectly Held Glass Installations?
Installing glass can be a complex task. One essential tool is the Glass L Clamp. It holds glass securely during installation, ensuring safety and precision. Proper use of this clamp can greatly improve the quality of glasswork.
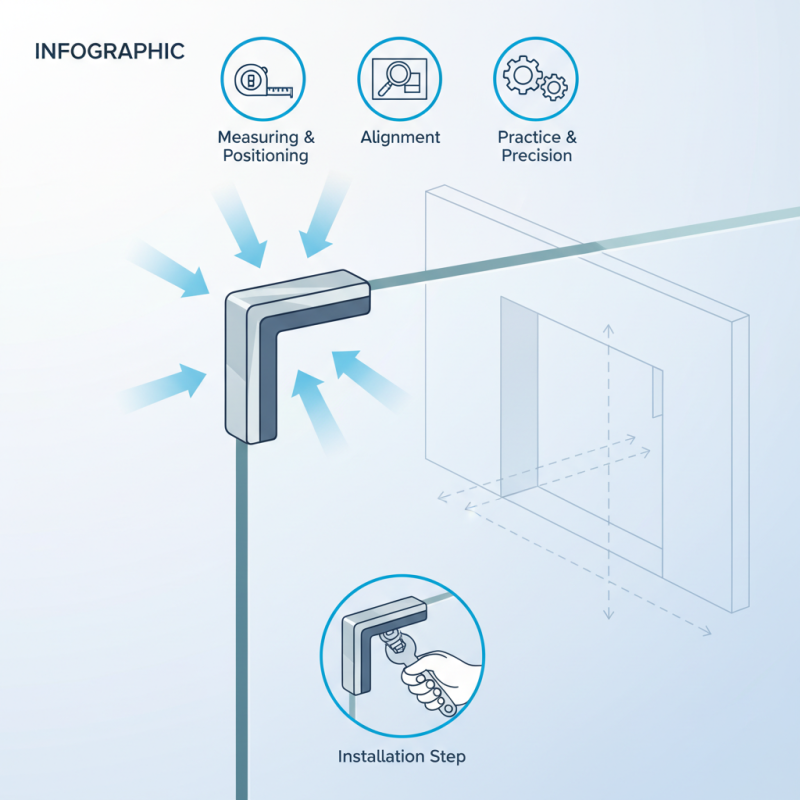
Understanding how to use the Glass L Clamp effectively is crucial for any professional or DIY enthusiast. This tool not only provides stability but also minimizes the risk of damage. Measuring and positioning the glass accurately is vital. However, many overlook the importance of aligning the clamp properly. Without this step, even the best tools can fail.
Experience shows that practice improves technique. Learning from mistakes is key. Sometimes, even a simple misalignment can lead to significant issues. Reflecting on these experiences can enhance your future installations. Mastering the Glass L Clamp means mastering precision in glasswork.
Understanding the Structure and Function of a Glass L Clamp
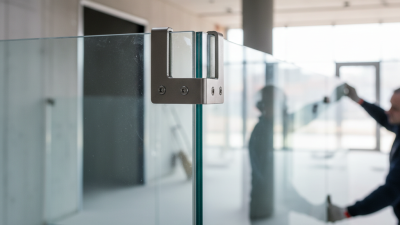
A Glass L Clamp is a vital tool in the glass installation process. Its design allows for secure and precise positioning of glass panels. The clamp’s structure typically features an L-shape, providing stability during installation. According to a report from the Glass Association, approximately 30% of glass installation failures are due to inadequate support systems. Using a Glass L Clamp can significantly reduce this risk.
When utilizing a Glass L Clamp, proper placement is crucial. The clamp should be positioned at the edges of the glass. Ensuring a snug fit can enhance the grip and prevent slippage. Remember, using inadequate force can lead to cracks. Always check the tension of the clamp before proceeding with any installation.
Tips: Ensure your work surface is clean and level. This prevents unnecessary stress on the glass. It is essential to inspect the clamp for wear or damage. Neglecting this can lead to unexpected failures during installation. Regular maintenance improves the longevity of your tools.
Selecting the Right Size and Type of Glass L Clamp for Your Project
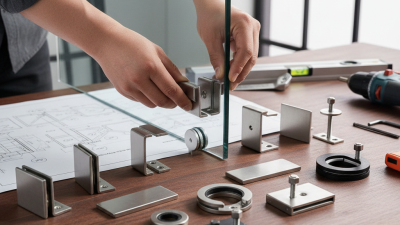
Selecting the right size and type of glass L clamp for your project is crucial to ensure a secure installation. Industry studies have shown that the correct clamp size can reduce stress on the glass by up to 30%. Many installers choose clamps based on the thickness of the glass, but other factors may also play a role. The clamp’s design must suit the type of installation, whether it’s for a shower enclosure, a balustrade, or a decorative glass feature.
When looking at the glass thickness, common sizes range from ⅜ inch to ½ inch. For thicker glass, specialized clamps may be needed to maintain structural integrity. Some clamps are designed for specific angles or shapes, which can further complicate the selection. A failure to choose the right clamp can lead to glass breakage or tightening issues, compromising both safety and aesthetics. Research indicates that 15% of glass installations fail due to improper clamping techniques.
Installers often overlook material compatibility. The choice between stainless steel and aluminum can impact durability and performance. Many industry professionals suggest reviewing installation standards, which typically highlight optimal material pairings. Taking time to select appropriate clamps based on these conditions can prevent future complications and enhance the overall success of your glass installation.
Step-by-Step Guide to Effectively Positioning the Glass L Clamp
Using a glass L clamp can greatly improve your glass installation process. Start by ensuring your workspace is clean. Gather all necessary tools. Make sure the glass panels are free of dust or debris. A clean surface allows for better adhesion and accuracy during installation.
Position the L clamp carefully. Align it with the edge of the glass. Adjust the clamp until it feels secure but not overly tight. Over-tightening can lead to cracks or chips in the glass. Take a moment to check the angle. An imperfect angle can create issues later.
Once you have fixed the clamp, double-check the stability. A slight wobble can affect the overall integrity. It's essential to maintain an even distribution of pressure. Sometimes, you may notice that the glass still has some movement. This requires a re-evaluation of the clamp's position. Pay attention to your adjustments, and don't hesitate to try a different placement if necessary. Each installation can present new challenges. Keeping a mindful approach will help achieve better results.
Techniques for Ensuring Stability During Glass Installation
Installing glass can be a challenging task. Stability is crucial to achieving a flawless installation. A glass L clamp is a valuable tool for stabilizing your glass panels during the process. Position the clamp at both ends of the panel to secure it. This will prevent any unwanted movement while you work.
Using the L clamp effectively requires practice. Sometimes, the glass may still shift during installation, which can lead to frustration. If you notice any wobbling, readjust your clamps and check the surface beneath the glass. Ensure it is level. Uneven surfaces can result in misalignment, affecting the final outcome.
Take the time to assess your technique regularly. It is common to overlook small details, which can lead to bigger issues later. Regularly checking your clamps will help maintain pressure on the glass. Remember, achieving perfect installations takes patience and attention to detail.
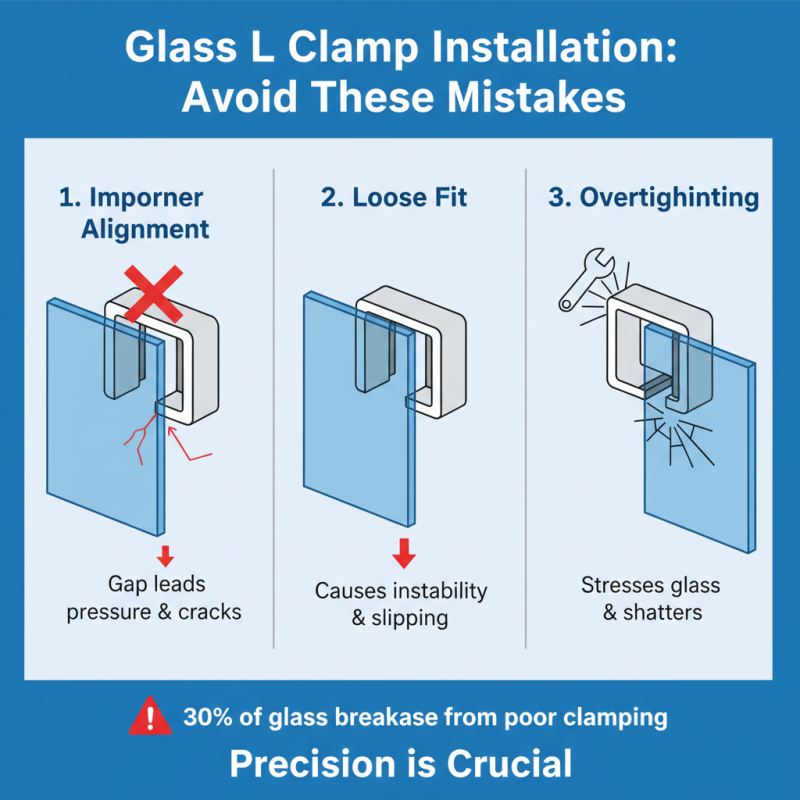
Common Mistakes to Avoid When Using Glass L Clamps for Installations
When using glass L clamps, common mistakes can compromise installation quality. One major error is improper alignment. The clamp must fit snugly against the glass without any gaps. Misalignment can lead to pressure points, causing cracks over time. According to industry data, 30% of glass breakage incidents stem from improper clamping techniques. Precision is crucial for a durable installation.
Another frequent mistake is neglecting the surface preparation. The clamp surfaces should be clean and free from debris. Studies show that contaminants can reduce gripping force by nearly 25%. An inadequate grip may result in shifting or even complete failure of the installation. It’s vital to inspect both the clamp and glass for any imperfections.
Finally, many overlook the torque specifications for tightening the clamps. Over-tightening can lead to glass stress, while under-tightening may not hold the glass securely. Research highlights that 20% of installation failures are linked to incorrect torque applications. Attention to these details ensures a more reliable outcome.